Google Pay™
Introduction
Google Pay™ is a contactless payment service that enables users to make payments both online and in physical stores using Android devices. It simplifies payments by securely storing card details and allowing transactions via NFC technology.
Transactions use tokenization to protect sensitive card information, replacing the actual card number with a virtual account number. This ensures secure processing without exposing card details. Google Pay™ supports one-time transactions as well as subscriptions and other recurring payments, based on merchant configurations.
Google Pay™ is available in various regions worldwide, supporting multiple currencies. For online and in-app payments, SmartPay's SDK securely collects payment details, which are then transmitted to Google's servers for processing and authorization. The entire flow keeps sensitive data hidden from the merchant, providing customers with a secure and easy payment experience.
There are two ways to test the integration: one using a Google Wallet™ account with personal cards on an Android device, and another using Google-provided test cards in the Chrome browser. The first method simulates real payment flows without charging the card and is suitable for production readiness. The second is intended for early-stage testing and allows basic validation during development.
Workflows and Transaction Types
SmartPay Integration Flow for Merchants
Merchants should adhere to the integration process detailed in the Google Pay™ Integration Prerequisites, ensuring all registration and verification steps are completed.
Google Pay™ supports VISA and Mastercard transactions.
Customer-Initiated Transactions (CIT)
- Guest Payments: Google Pay™ facilitates guest payments without the need to store payment credentials.
- Registered Users: Registered users can store Google Pay™ as a payment option for streamlined future transactions.
Merchant-Initiated Transactions (MIT)
- Subscriptions: Google Pay™ supports recurring payments for subscription services.
- Storable Payment Option: Google Pay™ can be stored as a payment option, enabling efficient future transactions.
Google Pay™ can be stored as a payment option only for subscriptions and unattended MIT payments. Transactions processed through a Google Wallet™ account rely on device authentication and can only be completed using payment credentials saved on the customer's Android device.
Transaction Status Flow
Merchants should implement SmartPay notifications to receive transaction status updates. Upon receiving a notification, merchants must call the Get Payment Status API to verify the transaction status.
SDK Integration
Google Pay™ transactions are processed through SmartPay's SDK for efficient integration directly into your online checkout experience. For optimal performance and user experience, merchants should ensure their integration aligns with Google's guidelines outlined in their Web Developer Documentation, as well as confirm compatibility with Google Wallet™.
Customizable Google Pay™ Button
To customize the Google Pay™ button within an API request, include the googleButtonType and googleButtonStyle parameters in criteria (see example below). The "type" parameter defines the text displayed on the button, such as a standard payment label or a subscription-related prompt, while "style" controls the button's visual theme to match different background and branding requirements. These parameters determine how the Google Pay™ button is generated on the page, ensuring flexibility in its presentation. By specifying these attributes, merchants can align the button's appearance with their checkout flow while maintaining compliance with Google's UI guidelines. Google does not support the creation of your own custom Google Pay™ button from scratch.
For visual consistency, please refer to Google's Brand Guidelines for additional styling and placement requirements.
Example request
Path:
POST {Base URL}/payment/mit/subscription/creation
Header:
Content-Type: application/json
Accept-Language: en-US
X-Auth-Token: eyJjb25uZW***AwMjZ2PTQifQ==
User-Agent: ***
{
    "payment": {
      "currencyCode": "EUR",
      "amount": 0,
      "description": "JPM-2eb31abc-fc0f-49bf-9344-469459d0ddd4"
    },
    "billingAddress": {
      "addressLine1": "Gotzkowskystraße",
      "number": "10000",
      "city": "Delbrück",
      "postCode": "33129",
      "countryCode": "DE"
    },
    "consumer": {
      "emailAddress": "0afd44eb1bf44812a580e1cb84cd3f59_demo.admin@test.com",
      "lastName": "Admin",
      "firstName": "Demo",
      "title": "Mr",
      "mobilePhone": "12345678910",
      "dateOfBirth": "1983-06-06"
    },
    "customerAccountId": "2d7acb77-4b14-436e-be88-325ac2eece9e:0afd44eb-1bf4-4812-a580-e1cb84cd3f59",
    "merchantKey": "1e500c04-3b64-40fa-9e13-734e0b95538e",
    "criteria": [
      {
        "name": "googleButtonType",
        "value": "subscribe"
      },
      {
        "name": "googleButtonStyle",
        "value": "black"
      }
    ]
  }
The following parameters can be configured:
| googleButtonType | Representation |
|---|---|
| book |  |
| buy |  |
| checkout |  |
| donate |  |
| order |  |
| pay |  |
| plain |  |
| subscribe |  |
| googleButtonStyle | Representation |
|---|---|
| default |  |
| white |  |
| black |  |
The Google Pay™ button is rendered dynamically via Google's API, and should not be hardcoded or recreated manually.
Multiple Domains Support
To support multiple merchant domains for Google Pay™, merchants need to register them with Google, as only the domains added to Google Pay's whitelist will be valid for use. Please see the integration section for Google Pay™ Console - Registration of the shop domain below.
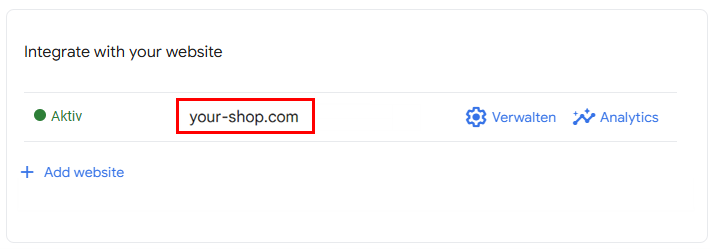
The registered domain automatically extends to its sub-directories as listed below, allowing Google Pay™ transactions on localized pages without requiring separate configurations.
your-shop.com
your-shop.com/de
your-shop.com/fr
Merchants must align with their Product Solution Specialist to ensure all relevant domains are configured within the backend program settings before initiating Google Pay™ transactions. The domain should be provided without "https://", as the API handles secure connections internally.
The domain submitted to Google should match the exact origin where the payment sheet is rendered and should not forward traffic to a different domain or staging environment. This helps Google™ verify the integration.
Google Pay™ Integration Prerequisites
Integration of Google Pay™ payment option includes registration, preparation and testing of the new payment option. To begin the integration process for Google Pay™ via Hosted Checkout, follow the steps outlined below, starting with the Web Developer Documentation and integration checklist.
The dedicated Product Solution Specialist will be your partner during the integration process.
After the testing is successful, it is possible to continue with the preparation for production deployment.
The merchant provides integration details to both Google™ and dedicated Product Solution Specialist during the integration process.
1. Registration with Google™ and JPM MPS
1.1. Google Console
Merchants need to register their business with Google™ by creating an account and submitting the required legal details at Google™ Console. This includes company information, business type and payment processing preferences.
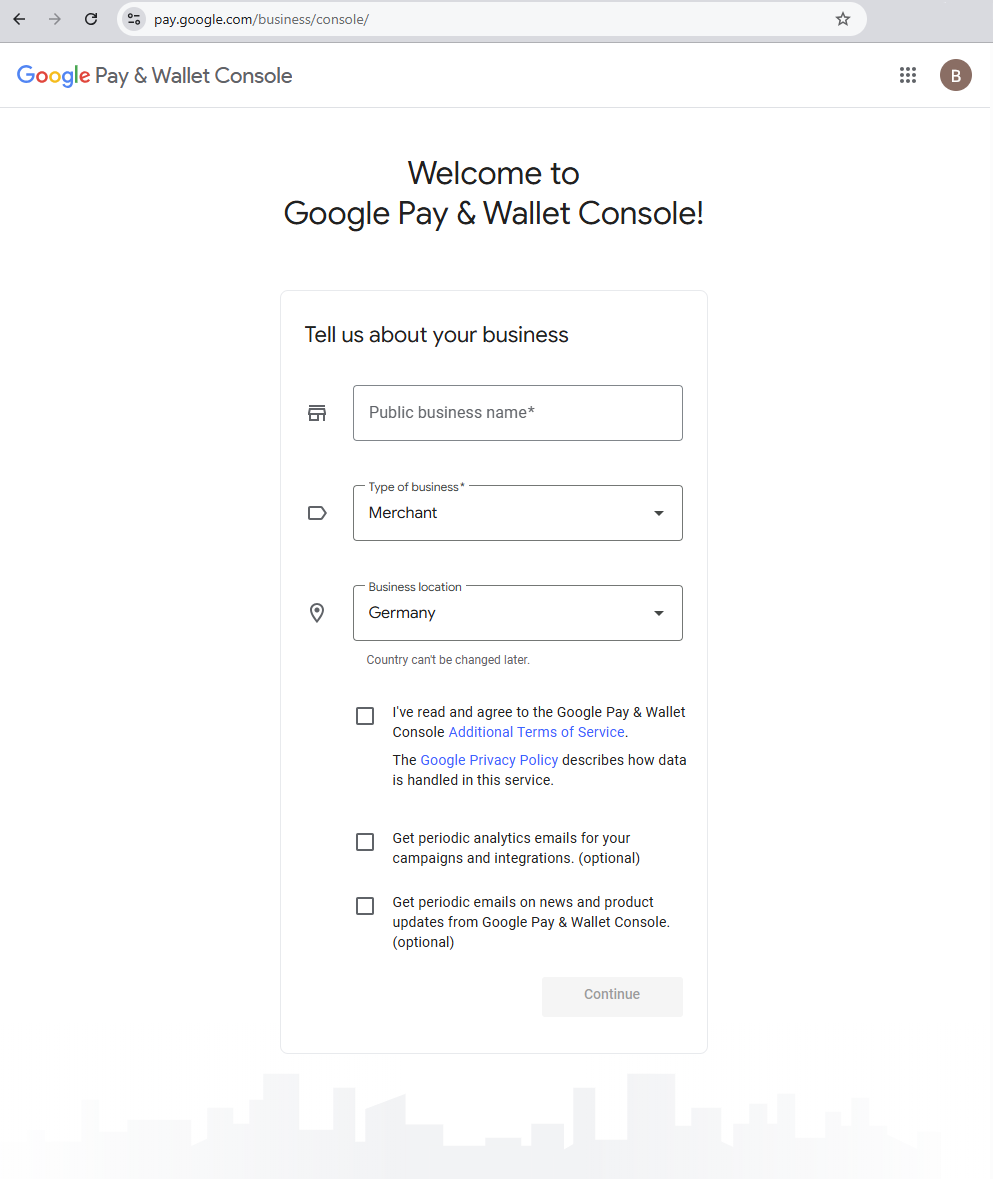
As part of the initial setup flow, the merchant must accept the Google Pay™ and Wallet™ APIs Acceptable Use Policy and Terms of Service directly in the Business Console before continuing with test or production integration. This step is required before testing or going live with the integration.
1.2. Merchant ID
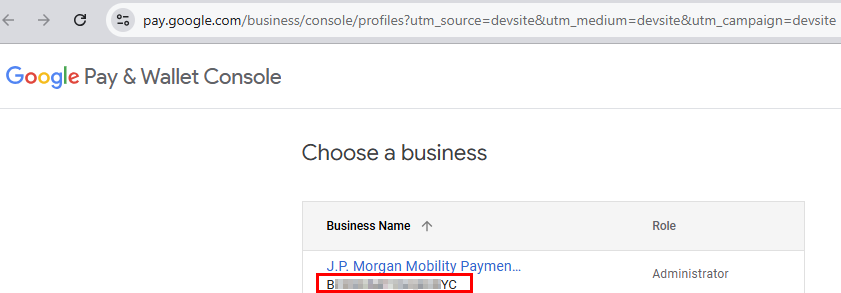
After registration, a unique Merchant ID is generated. The ID is displayed in the Business Information section below the company name. Merchants should provide the Merchant ID to the Product Solution Specialist for configuration.
1.3. SmartPay SDK
The next step is the integration with JPM MPS using SmartPay's SDK.
2. Test Google Pay™ on the testing environment
Google™ provides two methods for testing transactions with Google Pay™.
2.A. Google Wallet™ with Personal Card
- This method allows testers to use a real Google Wallet™ account with personal cards. These transactions do not involve real payments, and no funds are debited. Instead, this option helps validate the integration using live payment credentials.
- To use this method, testers must join the Google Test Group required for testing with production cards and must have a working Android device with Google Wallet™ installed, including a valid Visa or Mastercard card.
- Testing with a personal Google Wallet™ account is supported only on physical Android devices that have NFC enabled and the Google Wallet™ app installed. iOS devices and emulators are not supported for this type of test.
- The
CRYPTOGRAM_3DSoption must be configured in SmartPay settings by your Product Solution Specialist to ensure proper handling of 3D Secure cryptograms during transactions for authentication.- Please refer to Google™'s Test with sample tokens.
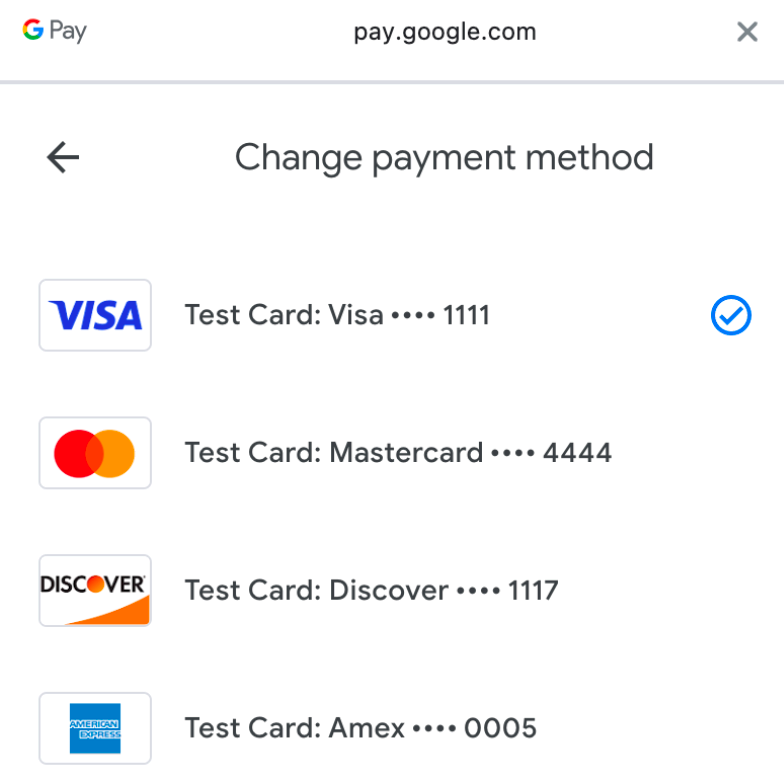
2.B. Test cards
- Google™ offers the use of test cards option for developers looking to perform basic Google Pay™ test transactions without using an Android device. Google™ test cards are supported exclusively in the Chrome browser and require integration via ACI Worldwide.
- To enable this testing method, testers must subscribe to the Google Test Card Suite Subscription by signing in with their Google™ account through Chrome and follow the subscription process. To unsubscribe, testers must navigate to Google Groups and remove their subscription.
- SmartPay settings should be configured by your Product Solution Specialist (
PAN_ONLY) beforehand to facilitate the use of test cards.- For more information, please visit Google™'s documentation on Test with sample cards.
Both testing modes align with Google's testing recommendations and ensure correct behavior during test or live review.
For authorization, add paymentOptionCode: GGLPAY.
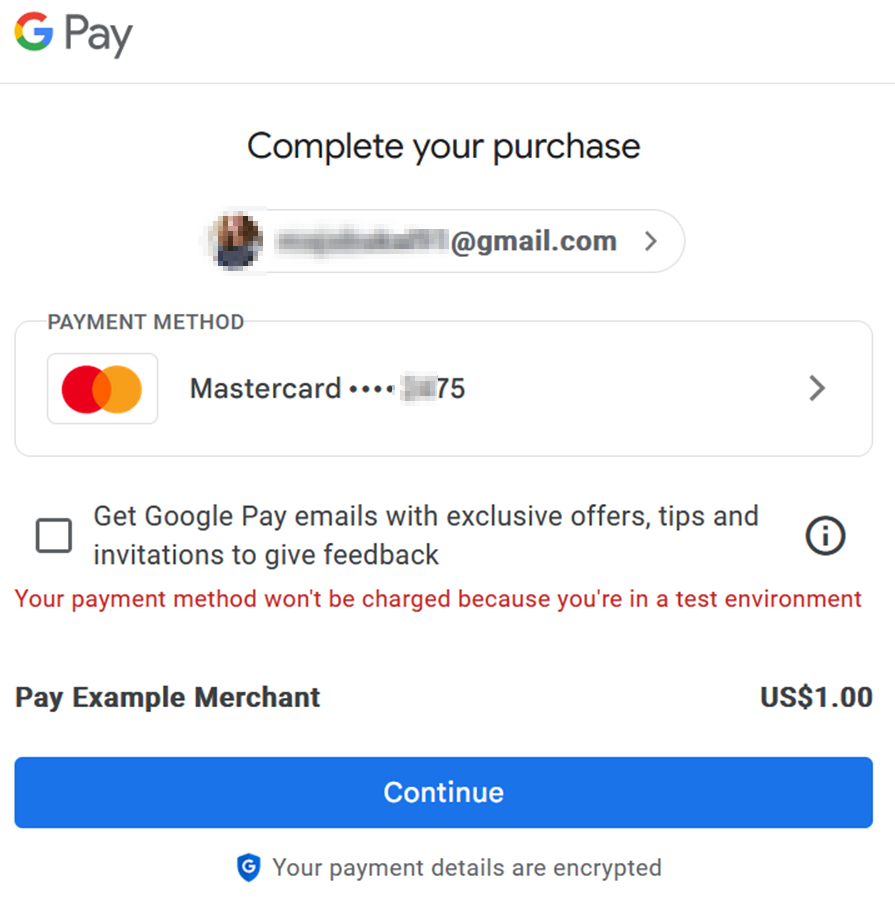
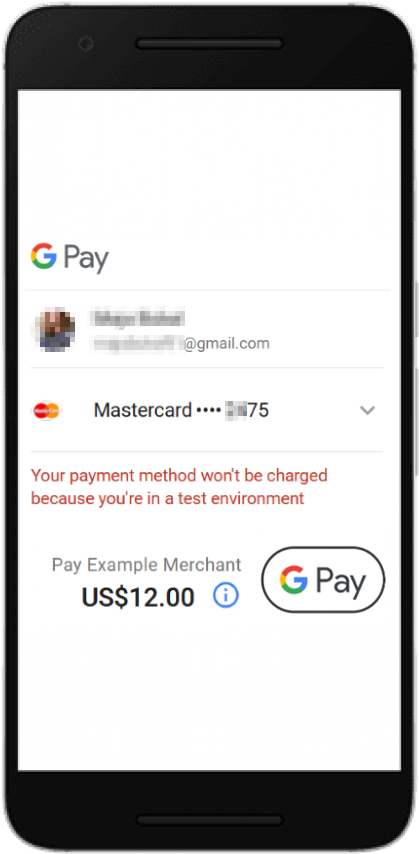
Merchants can use end-to-end functionality for seamless payment completion. When a tester clicks on the Google Pay™ button, the process maintains the browser's user activation behavior, allowing the Google Pay™ API to display a payment sheet without interference from pop-up blockers. The Google Pay™ payment sheet is a secure interface that appears when a customer selects Google Pay™ as their payment method and displays the customer's saved payment methods (e.g., the cards stored in Google Wallet™), shipping address and contact details, allowing them to confirm and complete the payment with a single tap. The sheet is presented as an overlay or modal directly in the browser or app and is managed entirely by Google, so the merchant never handles sensitive payment data.
Before processing the transaction, the merchant must display a final price to the user. If the amount to be charged has varied based on data received from the Google Pay™ API, the merchant is expected to show a confirmation page with the final price.
To remain compliant, the Google Pay™ payment sheet should only be displayed after the customer actively interacts with the page, such as clicking a button. Triggering the payment sheet automatically or in the background is not supported and may prevent it from opening. This helps maintain browser compatibility and meets user interaction requirements enforced by Google.
Storing Google Pay™ is allowed only in case of subscriptions and unattended MIT payments.
In the test TEST environment, Google™ offers two ways to test transactions. Merchants can use Google-provided test PANs, or they can use a regular Google Wallet™ account with personal cards, which are not used to process real payments and are not debited.
For PROD environment, only Google Wallet™ cards are accepted.
3. Production Prerequisites
Once the testing is done, the next step is preparing for the production deployment and implementing the procedure for going live. During this phase, the merchant provides integration details to both Google™ and dedicated Product Solution Specialist for activation:
- Registration of Shop domain that hosts the checkout.
- Registration of Google Pay™ connector URL and Google Pay™ integration type.
- Screenshots of the checkout.
- Production activation.
Before going live in production, the merchant should submit integration details to Google™ via the Google™ Console.
Before submitting the integration to Google™ for validation with a PaymentsClient configured for a TEST environment, ensure that the exit criteria are fulfilled for each of the following functional and branding checks.
3.1. Registration of the shop domain
Register the Shop domain that hosts the checkout to Google™ through Google Console.
 info
infoProvide this domain to the dedicated Product Solution Specialist upon registration with Google.
The registered domain should correspond to the environment where the Google Pay™ button is implemented, as mismatches between domain and integration setup may lead to transaction issues.
3.2. Registration of the Google Pay™ Connector and Integration Type
Register the Google Pay™ connector URL:
api.googlepay.upcf.jpmmps.comthrough Google™ Console. For Google Pay™ API integration type, select: Gateway.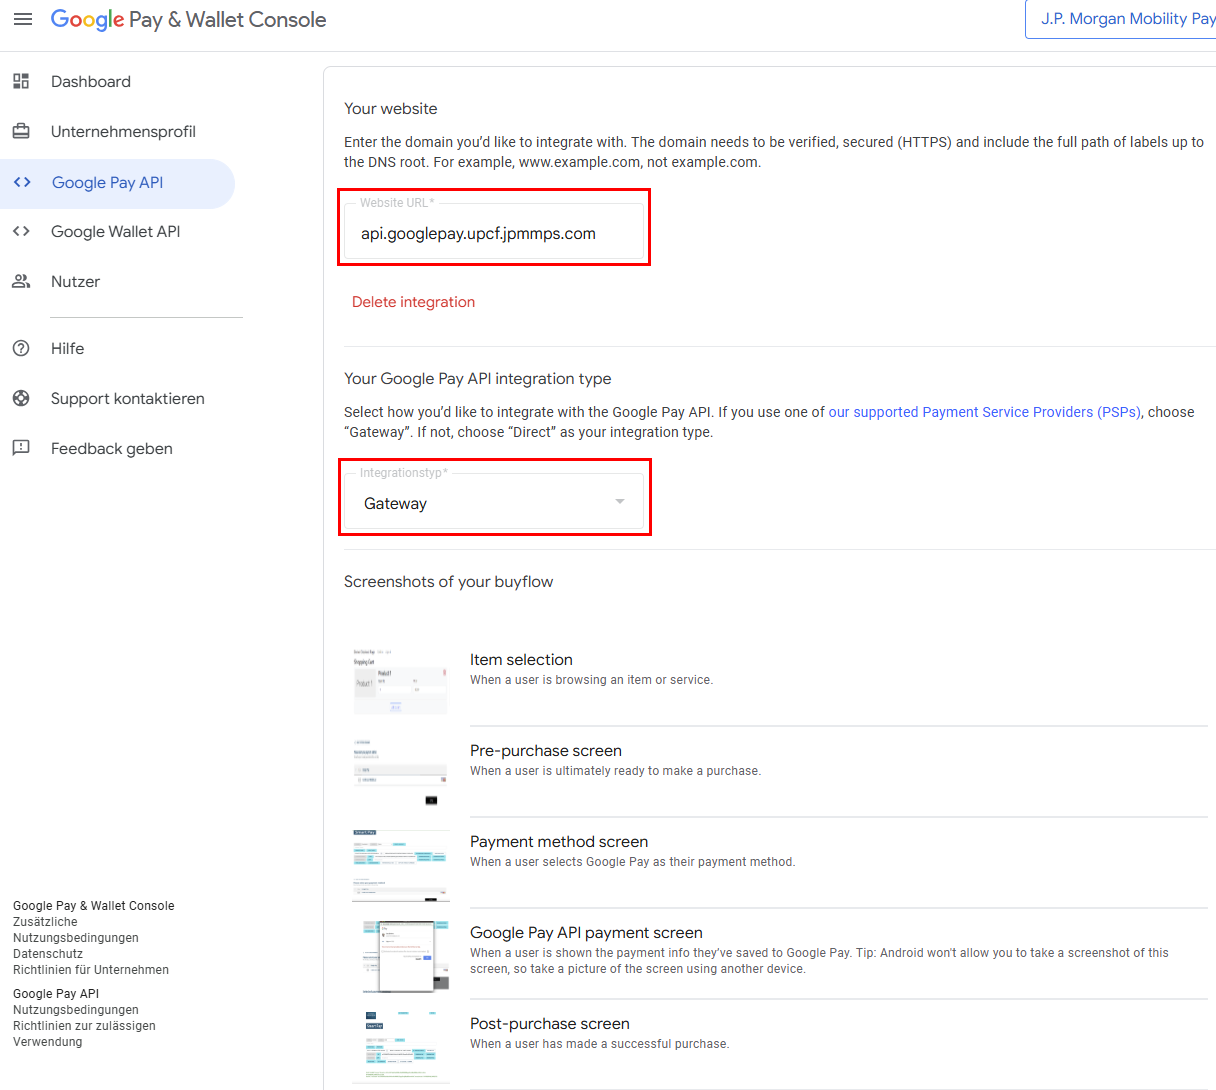
To ensure that transactions are processed correctly, the connector URL used in the Google Console should be entered exactly as provided during onboarding. Using a different or modified URL may prevent the payment request from reaching SmartPay's systems.
3.3. Screenshots of the Checkout for Google Pay™
Please provide the following screenshots of the Checkout for Google Pay™ through Google Console:
- Item selection - screenshot where the customer views or selects products or services before checkout.
- Pre-purchase page - the order summary page showing selected items and total price before choosing a payment method.
- Payment method selection - screenshot where the customer chooses Google Pay™ as their preferred payment option.
- Google Pay™ API payment sheet - the secure Google interface displaying saved payment methods, shipping info, and a confirmation button.
- Post-purchase confirmation - page confirming that the payment was successful and the order was placed.
infoAndroid doesn't allow taking a screenshot of these screens, so the screenshot should be taken using another device.
Checkout screenshots submitted for review should represent actual user flows with real data and complete UI. Placeholder content or mockups are not accepted as part of the production review by Google™. Please include full context for each screenshot, with visible product names, pricing and a properly rendered Google Pay™ button.
3.4. Request to go live
After all the steps have been completed, the merchant can request activation for PROD integration through Google™ Console.
importantGoogle Pay™ transactions with SmartPay require device authentication through the Google Wallet™ app. Only cards stored in Google Wallet™ can be used for payments, transactions without device authentication are not supported.
After you submit your integration for review, Google™ may request additional information, test evidence, screenshots or clarifications. Merchants should promptly coordinate with their Product Solution Specialist to apply required changes. Google's review process typically takes 5-7 business days after submitting production access. Delays may occur if screenshots or test steps are missing.
infoEnsure that the
PaymentsClientis set to PRODUCTION only once the integration has been reviewed and approved by Google.
Useful links when integrating Google Pay™
- Google Pay™ Web developer documentation
- Google Pay™ Web integration checklist
- Google Pay™ Web Brand Guidelines
- All merchants must login to Google Pay™ Business Console and accept Google Pay™ APIs Acceptable Use Policy and agree to the terms defined in the Google Pay™ API Terms of Service.
- Merchants can regularly monitor the Google Pay™ Status Dashboard for any ongoing issues or outages that could impact payment processing.
Google Pay™ Test Data
For testing Google Pay™, please follow the instructions above.