iOS SDK
Integration options
Activity mode
The SmartPay Activity Mode provides you with a complete checkout screen. The user can navigate back to the previous activity by just pressing the back button.
Fragment mode
The SmartPay Fragment Mode allows you to integrate the SmartPay fragments directly into your app experience and gives you maximum control over the various checkout elements.
Add SmartPay SDK to your app
To integrate the SmartPay SDK into the other project, it is necessary to perform a few basic tasks to prepare the project. This tutorial assumes your IDE for application development is Xcode.
First of all, add SmartPay.framework and KontoCloudSDK.bundle into your project.
To add SmartPay.framework copy it to your project's folder (or any other path which is suitable for you) and then in Xcode go to Project Editor's General tab of your target → Frameworks and Libraries section → tap + button, then click 'Add Other' and select SmartPay.framework in the folder where you copied it. Another way is to simply drag and drop SmartPay.framework in Xcode's Project Navigator of your project. Make sure that in Project Editor's General tab in Frameworks and Libraries section there is 'Embed and Sign' option selected for SmartPay.framework.
To add KontoCloudSDK.bundle copy it to your project's folder (or any other path which is suitable for you) and then in Xcode go to Project Editor's Build Phases tab of your target → expand 'Copy Bundle Resources' section → tap + button, then click 'Add Other' and select KontoCloudSDK.bundle from where you copied it. Check 'Copy items if needed' option in dialog.
Remove unused architectures: SmartPay SDK is a universal framework which allows to use it on real devices and in simulators. At the same time, AppStore doesn't allow to upload applications which contain universal frameworks (as it is not allowed to upload applications with unused architectures which are in this case iOS simulator ones).
To avoid errors during the distribution of your application with SmartPay SDK to AppStore you should perform the following steps:
Go to your project target's build phases section and add new run script phase:
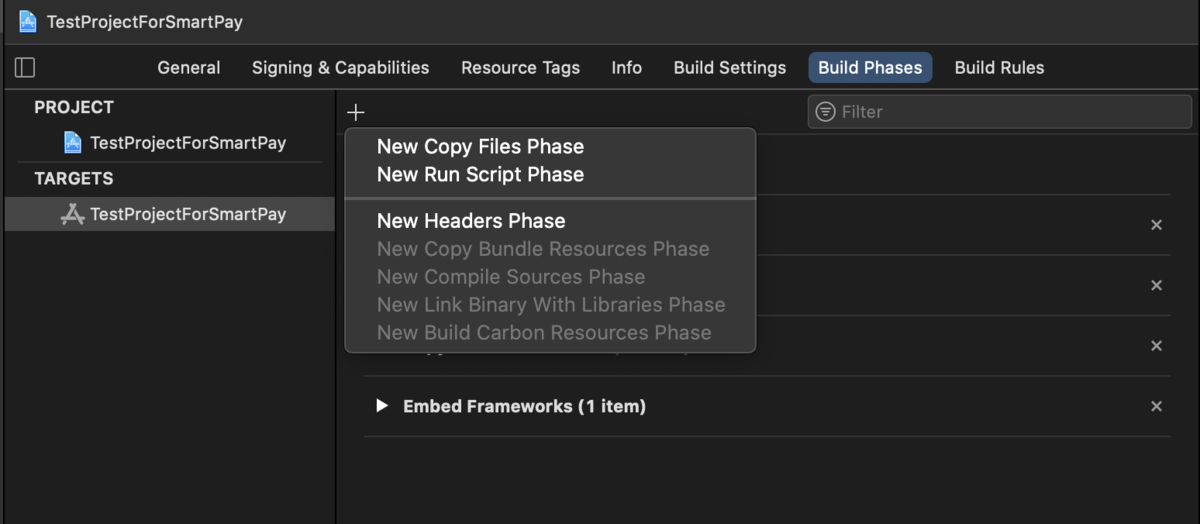
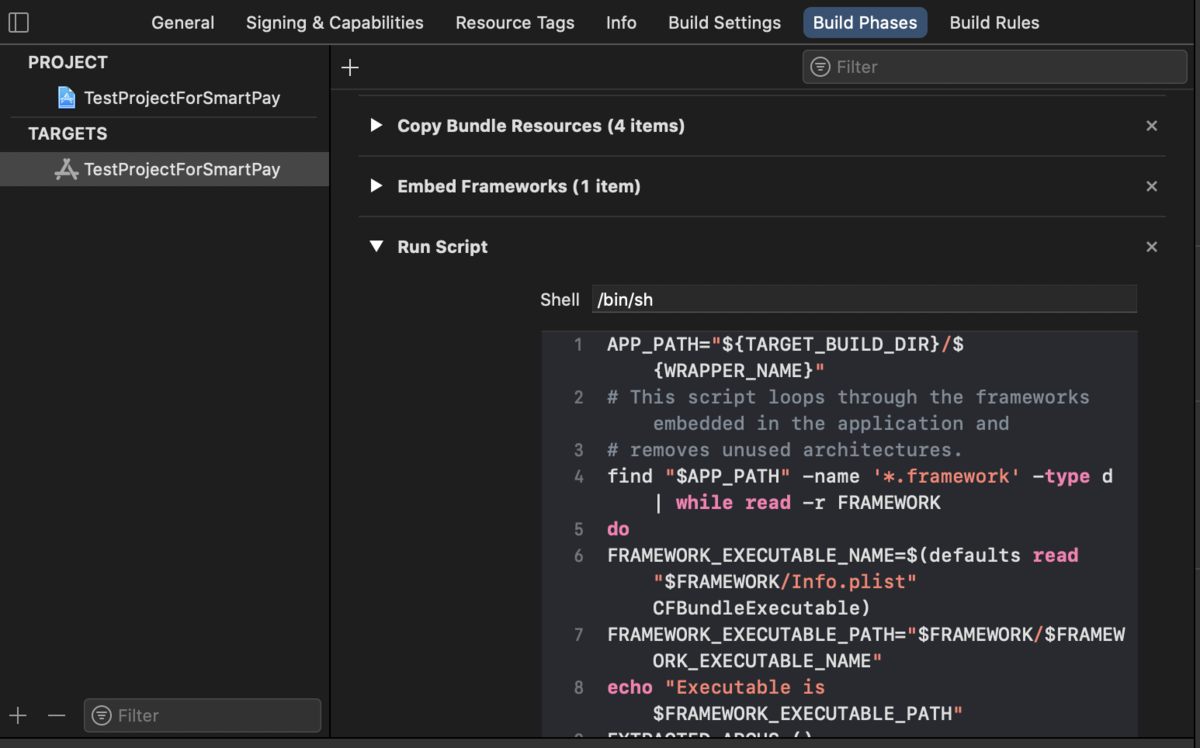
Paste the following script as script body in appeared run script section:
APP_PATH="${TARGET_BUILD_DIR}/${WRAPPER_NAME}"
# This script loops through the frameworks embedded in the application and
# removes unused architectures.
find "$APP_PATH" -name '*.framework' -type d | while read -r FRAMEWORK
do
FRAMEWORK_EXECUTABLE_NAME=$(defaults read "$FRAMEWORK/Info.plist" CFBundleExecutable)
FRAMEWORK_EXECUTABLE_PATH="$FRAMEWORK/$FRAMEWORK_EXECUTABLE_NAME"
echo "Executable is $FRAMEWORK_EXECUTABLE_PATH"
EXTRACTED_ARCHS=()
for ARCH in $ARCHS
do
echo "Extracting $ARCH from $FRAMEWORK_EXECUTABLE_NAME"
lipo -extract "$ARCH" "$FRAMEWORK_EXECUTABLE_PATH" -o "$FRAMEWORK_EXECUTABLE_PATH-$ARCH"
EXTRACTED_ARCHS+=("$FRAMEWORK_EXECUTABLE_PATH-$ARCH")
done
echo "Merging extracted architectures: ${ARCHS}"
lipo -o "$FRAMEWORK_EXECUTABLE_PATH-merged" -create "${EXTRACTED_ARCHS[@]}"
rm "${EXTRACTED_ARCHS[@]}"
echo "Replacing original executable with thinned version"
rm "$FRAMEWORK_EXECUTABLE_PATH"
mv "$FRAMEWORK_EXECUTABLE_PATH-merged" "$FRAMEWORK_EXECUTABLE_PATH"
done
You should have the following result:
Troubleshooting
-
If your app crashes during the attempt to display SmartPay UI with message
*** Terminating app due to uncaught exception 'NSInvalidArgumentException', reason: '*** -[NSBundle initWithURL:]: nil URL argument'- most likely it means that KontoCloudSDK.bundle is not properly added. Please check if it is present in 'Copy Bundle Resources section' of Build Phases in your project's target. -
If your app crashes at startup with message
dyld: Library not loaded: @rpath/SmartPay.framework/SmartPay Reason: image not found- then please make sure that 'Embed and Sign' option is selected for SmartPay.framework in Frameworks and Libraries section in General tab of your project's target. -
If you see error
No such module 'SmartPay'when trying to import SmartPay - check path to SmartPay.framework file and Framework Search Paths of your project. -
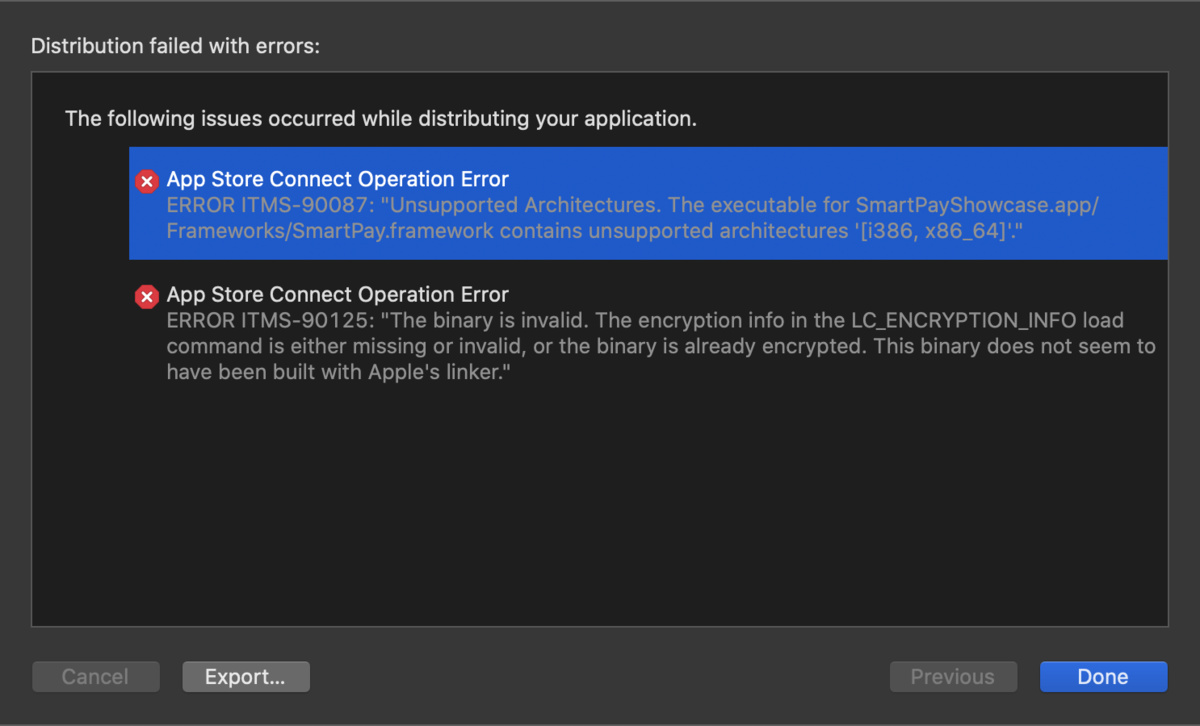
If you have error
App Store Connect Operation Error ERROR ITMS-90087: "Unsupported Architectures. The executable for SmartPayShowcase.app/Frameworks/SmartPay.framework contains unsupported architectures '[i386, x86_64]'.during the distribution of your application to AppStore - you need to exclude unused architectures from SmartPaySDK framework. Check previous section for more info (Important! Remove unused architectures).
Environment selection
Add import statement at the top of files where you want to use SmartPay SDK:
import SmartPay
SmartPay SDK has two environment options:
SmartPayEnvironment.TEST(correlates with SANDBOX environment)SmartPayEnvironment.LIVE(correlates with PROD environment)
SmartPay SDK will use .TEST by default. If you want to use another environment - override smartPayOptions property of SmartPay:
import SmartPay

class AppDelegate: UIResponder, UIApplicationDelegate {

    var window: UIWindow?

    func application(_ application: UIApplication, didFinishLaunchingWithOptions launchOptions: [UIApplication.LaunchOptionsKey: Any]?) -> Bool {
        SmartPay.shared.smartPayOptions = SmartPayOptions.init(smartPayMode: .LIVE)
        return true
    }
}
It is not mandatory to do it in AppDelegate, you can do it wherever is convenient for you. Just make sure that you override it before starting Activity or Fragment instances.
There is also no need to specifically initialize SmartPay. It will be automatically initialized when you start using Activity or Fragment instances.
Complete payment in Activity mode
Activity mode allows you to present Checkout screens over current content as presentedViewController with its own navigation.
Get an instance of SmartPayCheckoutActivity
let `SmartPayCheckoutActivity` = SmartPayCheckoutActivity.getActivityInstance(delegate: self)
// OR
let `SmartPayCheckoutActivity` = SmartPayCheckoutActivity.getActivityInstance()   // omit delegate parameter if you don't want to receive callbacks from Activity or if delegate is already set
Perform its startActivityForResult(viewController:, transactionId:, style:, completion:) function
smartPayCheckoutActivity.startActivityForResult(viewController: self, transactionId: transactionId, style: userStyle, completion: {})
where:
viewController- your view controller from which you want to present SmartPay Checkout screens (presentingViewController);transactionId- string with transactionId;style- custom user Style object for design (omit this parameter to use default style).
Receive activity result via SmartPayCheckoutActivityDelegate methods
extension ViewController: SmartPayCheckoutActivityDelegate {
    func onActivityResult(result: SmartPayResult) {
        // called when transaction succeeded or failed
    }

    func onActivityCancelled() {
        // called when user cancelled Checkout by tapping on Back
    }
}
SmartPayResult object will contain the following information about performed transaction:
type- SmartPayPaymentResultType (success, cancel or error);transactionId- string with TransactionId;transactionState- string with transaction state (CAPTURED,ERROR,CAPTURE_PENDING);message- string with any additional information about payment (usually is used for error messages).
| SmartPayPaymentResultType | Description |
|---|---|
| SmartPayPaymentResultType.success | Successful transaction execution |
| SmartPayPaymentResultType.error | Transaction has failed |
| SmartPayPaymentResultType.cancel | deprecated and will be removed. onActivityCancelled() func should be used for cancelled case |
Complete payment in Fragment mode
Fragment mode allows user to show checkout screen(s) inside the specific view on the screen.
Get an instance of SmartPayCheckoutFragment
let `SmartPayCheckoutFragment` = SmartPayCheckoutFragment.getFragmentInstance(containerEventListener: SmartPayContainerEventListener?, clickPaymentMethodListener: SmartPayClickPaymentMethod?, mandateListener: SmartPayMandateListener?)
// OR
let `SmartPayCheckoutFragment` = SmartPayCheckoutFragment.getFragmentInstance()   // omit any (or all) parameter if you don't want to receive specific callbacks from Fragment or if listener is already set
Add a container view on screen which will be used as a container for Checkout screens
Perform startFragment(step:, inContainer:, viewController:, transactionId:) function of SmartPayCheckoutFragment instance
smartPayCheckoutFragment.startFragment(step: paymentProcessStep, inContainer: smartPayContainerView, viewController: self, transactionId: transactionId)
where:
step- case of enum SmartPayPaymentStep (optionsList, form) which indicates what step of Checkout process should be displayed in fragment;inContainer- container view in which Checkout screen should be displayed;viewController- UIViewController which will have a role of parent view controller for child Fragment view. Normally it should be a view controller which has container view;transactionId- string with transactionId.
| SmartPayPaymentStep | Description |
|---|---|
| optionsList | Fragment with list of available Payment Options |
| form | Fragment with Payment submit form (create or confirm) |
Receive container (fragment) events
| SmartPayContainerEventListener | Description |
|---|---|
| smartPayFinished(withResult result: SmartPayResult) | Payment process has ended with result |
| smartPayPaymentOptionStored() | The payment option has been successfully stored. Return back to .optionsList fragment to see stored payment option |
| smartPayPaymentFormCancelled() | Called when Payment Form was cancelled (closed) (for example, when cross button tapped on PayPal payment form) |
| smartPayPrepareFragment (fragmentStep: SmartPayPaymentStep) | Called when fragment at specific step is preparing (loading or necessary data is not selected/provided). Means that payment can not be continued, could be used for disabling/renaming buttons in user's interface |
| smartPayReadyFragment (fragmentStep: SmartPayPaymentStep) | Called when fragment at specific step is ready. Means that user can interact with it and continue payment |
Example of SmartPayContainerEventListener usage:
extension ViewController: SmartPayContainerEventListener {
    func smartPayFinished(withResult result: SmartPayResult) {
        // show result
    }

    func smartPayPaymentOptionStored() {
        // open screen with .optionsList fragment
    }

    func smartPayPaymentFormCancelled() {
        // open screen with .optionsList fragment
    }

    func smartPayPrepareFragment(fragmentStep: SmartPayPaymentStep) {
       // for example: show loading if .optionsList fragment is on the screen
       guard fragmentStep == .optionsList else { return }
       // show loading UI
    }

    func smartPayReadyFragment(fragmentStep: SmartPayPaymentStep) {
        // for example: hide loading if .optionsList fragment is on the screen
        guard fragmentStep == .optionsList else { return }
        // hide loading UI
    }
}
Receive SmartPayClickPaymentMethod events
| SmartPayClickPaymentMethod | Description |
|---|---|
| smartPayClickCreateStoredPaymentMethod() | Called when the end-customer selects payment option which will lead to process of creation of new stored payment |
| smartPayClickStoredPaymentMethod() | Called when the end-customer selects already stored payment option or default payment option was selected automatically |
| smartPayClickGuestPaymentMethod() | Called when the end-customer selects payment option that hasn't been already stored |
Example of SmartPayClickPaymentMethod events usage:
extension ViewController: SmartPayClickPaymentMethod {
    func smartPayClickCreateStoredPaymentMethod() {
        // open next screen which contains .form fragment
    }

    func smartPayClickStoredPaymentMethod() {
        // show PaymentConfirmation screen
    }

    func smartPayClickGuestPaymentMethod() {
        // show PaymentConfirmation screen
    }
}
receive SmartPayMandateListener events
While the end-customer pays with SEPA payment option, the mandate with terms and conditions is shown. SmartPayMandateListener is responsible for notifying when end-customer clicked on Accept or Cancel in mandate. If the end-customer clicks Cancel it is necessary to return to the payment selection screen.
| SmartPayMandateListener | Description |
|---|---|
| smartPayMandateCancel() | Called when user clicked Cancel button in mandate |
| smartPayMandateAccept() | Called when user clicked Accept button in mandate |
Example of SmartPayMandateListener events usage:
extension ViewController: SmartPayMandateListener {
    func smartPayMandateCancel() {
        // go back to screen with .optionsList fragment
    }

    func smartPayMandateAccept() {
        // do something
    }
}
Override SmartPay continue button
It is possible to override selector, title and visibility of the default SmartPay Continue button.
Override title
Use this method to change the title of default continue button. To change title - get current instance of SmartPayCheckoutActivity or SmartPayCheckoutFragment and call its setTextConfirmButton(title:, forStep:) function:
smartPayCheckoutActivity.setTextConfirmButton(title: "Custom title", forStep: .form)        // for activity mode
// OR
smartPayCheckoutFragment.setTextConfirmButton(title: "Custom title", forStep: .form)        // for fragment mode
Override visibility
Use this method to hide default buttons if you want to use your own buttons from your own screens. To hide default button - get current instance of SmartPayCheckoutActivity or SmartPayCheckoutFragment and call its setVisibilityConfirmButton(visibility:, forStep:) function:
smartPayCheckoutActivity.setVisibilityConfirmButton(visibility: false, forStep: .optionsList)   // hide continue button for options list in activity mode
// OR
smartPayCheckoutFragment.setVisibilityConfirmButton(visibility: false, forStep: .optionsList)   // hide continue button for options list in fragment mode
Override selector
Use this method if you want the default button to be visible but to perform some specific action when it is clicked. To override selector - get current instance of SmartPayCheckoutActivity or SmartPayCheckoutFragment and call its setOnClickConfirmButton(forStep: .optionsList, onClick:) function with onClick closure as new button selector and specific payment step for which this override should be applied:
// override continue button selector for Activity
smartPayCheckoutActivity.setOnClickConfirmButton(forStep: .optionsList, onClick: { [weak self] in
    // perform any custom actions
})

// OR

// override continue button selector for Fragment
smartPayCheckoutFragment.setOnClickConfirmButton(forStep: .optionsList, onClick: { [weak self] in
    // perform any custom actions
})
Be aware to not use strong pointers in closure to prevent retain cycles.
Override methods could be called independently of current state of Activity screens / Fragments. If override method was called before screen was created and displayed on the screen - it will automatically be applied when screen will be ready.
Continue manually
When you override default SmartPay SDK continue button you may eventually need to notify SDK that it is necessary to continue payment process. For example after selecting Payment option or after filling all data in payment form.
For SmartPayCheckoutActivity use func continueManually() -> SmartPayContinueManuallyResult. Activity mode has automatic navigation so it will continue from current step.
For SmartPayCheckoutFragment use function func continueManually(forStep:) -> SmartPayContinueManuallyResult. For Fragment mode you need to specify what exact step should be continued.
Example of usage:
@IBAction func userConfirmButtonClicked(_ sender: Any) {
    let continueResult = self.smartPayCheckoutFragment.continueManually(forStep: .optionsList)
    if continueResult == .willContinueToNextStep {
        openContainerSmartPayViewController(withTransactionId: transactionId!)
    }
Function continueManually() will return value of SmartPayContinueManuallyResult (it can be omitted if you don't need it).
| SmartPayContinueManuallyResult cases | Description |
|---|---|
| .willFinishPayment | Means that current step is last in payment process and no more screens should be presented |
| .willContinueToNextStep | Means that there is a next step (.form) in payment process (you may want to open screen with .form Fragment in this case) |
| .error | Payment could not be continued (for example if you try to use continueManually() for .optionsList while PaymentOption is not selected). |
Selected payment option view
There is SmartPayPaymentView implemented to show already selected payment option by the end-customer to pay for the order. This element can be designed separately from the main theme. To have everything working correctly this element must be shown only after the end-customer has selected a payment option to pay on the SmartPayCheckoutFragment screen.
Examples:


SmartPayPaymentView can be added programmatically or in xib/storyboard.
Example of adding SmartPayPaymentView programmatically:
smartPayPaymentView = SmartPayPaymentView()
smartPayPaymentView.translatesAutoresizingMaskIntoConstraints = false
self.view.addSubview(smartPayPaymentView)

smartPayPaymentView.topAnchor.constraint(equalTo: self.view.topAnchor, constant: 20).isActive = true
smartPayPaymentView.leftAnchor.constraint(equalTo: self.view.leftAnchor, constant: 20).isActive = true
smartPayPaymentView.rightAnchor.constraint(equalTo: self.view.rightAnchor, constant: -20).isActive = true
smartPayPaymentView.heightAnchor.constraint(equalToConstant: 65).isActive = true
self.view.layoutIfNeeded()
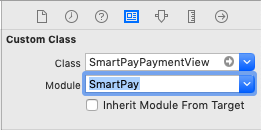
To add SmartPayPaymentView in xib/storyboard - place view element in your view/viewController, select it, open identity inspector and set view class to SmartPayPaymentView and module to 'SmartPay' in Custom Class section:
To update added SmartPayPaymentView (for example if it was added before selecting payment option) - use function updateView() of SmartPayPaymentView instance. Parameter userStyle should be omitted if you just want update selected payment option and don't want to update design:
smartPayPaymentView.updateView()
If you want to update SmartPayPaymentView design - pass userStyle property in updateView() function:
let paymentViewCustomStyle = PaymentViewStyle(paymentViewStylePrimaryTextColor: ... , ... , paymentViewStyleRadiusSize: ...)
smartPayPaymentView.updateView(withUserStyle: paymentViewCustomStyle)
Apply own styling (both integrations)
SmartPay allows some design customization. To apply custom design you need to pass initialized Style object as a parameter in startActivityForResult(viewController:, transactionId:, style:, completion:) function of SmartPayCheckoutActivity or in startFragment(step:, inContainer:, viewController:, transactionId:, style:, completion:) function of SmartPayCheckoutFragment depending of what mode you are using.
Style object includes styles for all customizable elements of the SmartPay SDK:
public class Style {
    var globalStyle: GlobalStyle?
    var confirmButtonStyle: ConfirmButtonStyle?
    var paymentOptionStyle: PaymentOptionStyle?
    var retryButtonStyle: RetryButtonStyle?
    var paymentViewStyle: PaymentViewStyle?
}
GlobalStyle object includes some basic options for application appearance:
| GlobalStyle property | Default value | Description |
|---|---|---|
| var smartPayColorBackgroundFragment: UIColor | UIColor.white | Background color for fragments |
| var smartPayColorNavigationBarBackground: UIColor | #0C384E | Background color for navigation bar |
| var smartPayColorNavigationBarText: UIColor | UIColor.white | Color for texts and buttons in navigation bar |
| var smartPayStatusBarStyle: UIBarStyle | UIBarStyle.black | Style of status bar (for light or dark content) |
ConfirmButtonStyle determines the appearance of default 'Continue' button on payment steps screens:
| ConfirmButtonStyle property | Default value | Description |
|---|---|---|
| var smartPayColorButtonConfirm: UIColor | #0C384E | Background color for normal state of button |
| var smartPayColorButtonConfirmSelected: UIColor | #0C384E | Background color for selected state of button |
| var smartPayColorButtonConfirmRipple: UIColor | #0C384E | Color of ripple animation effect (#not implemented yet) |
| var smartPayColorButtonConfirmCorners: Float | 0.0 | Corner radius |
| var smartPayColorButtonConfirmText: UIColor | UIColor.white | Color of title text for normal state of button |
| var smartPayColorButtonConfirmSelectedText: UIColor | UIColor.white | Color of title text for selected state of button |
| var smartPayColorButtonConfirmDeactivatedText: UIColor | #0C384E | Color of title text for disabled state of button |
| var smartPayColorButtonConfirmDeactivated: UIColor | #0C384E | Background color for disabled state of button |
PaymentOptionStyle object handles the design for Payment Options cells on Payment Options List screen (.optionList):
| PaymentOptionStyle property | Default value | Description |
|---|---|---|
| var smartPayColorPrimaryTextColor: UIColor | #4D5356 | Color for primary text in payment option cell |
| var smartPayColorSecondaryTextColor: UIColor | #A9ADB2 | Color for secondary text in payment option cell |
| var smartPaySizePrimaryText: Float | 12 | Size of primary text in payment option cell |
| var smartPaySizeSecondaryText: Float | 12 | Size of secondary text in payment option cell |
| var smartPayColorSelectedText: UIColor | - | #not used currently |
| var smartPayColorShowAll: UIColor | #194663 | Text color for labels: 'Show all', 'Show less', 'OR'. Text color for the arrow. |
| var smartPayColorImageShowBackground: UIColor | #87E1EC | Arrow background color; 'Show all/less' background color |
| var smartPayColorSelectedCardImageTint: UIColor | #5DCAA2 | Check mark color |
| var smartPayColorCardBackground: UIColor | UIColor.white | Payment option cell background color |
| var smartPayColorSelectedCardBackground: UIColor | UIColor.white | Selected payment option cell background color |
| var smartPayColorCardBorder: UIColor | #A9ADB2 | Payment option cell border color |
| var smartPayColorSelectedCardBorder: UIColor | #071E2B | Selected payment option cell color |
| var smartPayColorCardRipple: UIColor | #A9ADB2 | Ripple effect color. Ripple effect is shown after clicking the payment option (not implemented yet) |
| var smartPaySizeCardBorder: Float | 1.0 | Payment option cell border size |
| var smartPaySizeCardRadius: Float | 0.0 | Payment option cell border curving size |
RetryButtonStyle contains properties for Retry button customization (error view):
| RetryButtonStyle property | Default value | Description |
|---|---|---|
| var smartPayRetryButtonBorder: UIColor | UIColor.black | Color for border for normal state of button |
| var smartPaySelectedRetryButtonBorder: UIColor | UIColor.black | Color for border for selected state of button |
| var smartPayRetryButtonBackground: UIColor | UIColor.white | Background color for normal state of button |
| var smartPaySelectedRetryButtonBackground: UIColor | UIColor.white | Background color for selected state of button |
| var smartPayRetryButtonSizeBorder: Float | 0.5 | Size of border |
| var smartPayRetryButtonSizeRadius: Float | 0.0 | Corner radius size |
PaymentViewStyle determines design for SmartPayPaymentView:
| PaymentViewStyle property | Default value | Description |
|---|---|---|
| var paymentViewStylePrimaryTextColor: UIColor | #4D5356 | Color of primary text |
| var paymentViewStyleSecondaryTextColor: UIColor | #A9ADB2 | Color of secondary text |
| var paymentViewStyleSizePrimaryText: Float | 12 | Size of primary text |
| var paymentViewStyleSizeSecondaryText: Float | 12 | Size of secondary text |
| var paymentViewStyleBackgroundColor: UIColor | UIColor.white | Background color |
| var paymentViewStyleBorderColor: UIColor | UIColor.darkGray | Color for border |
| var paymentViewStyleBorderSize: Float | 1.0 | Size of border |
| var paymentViewStyleRadiusSize: Float | 5.0 | Corner radius size |
All properties in style objects are nullable which means that they can be omitted during the style object initialization. If property is omitted - SDK will use default value for it. For example, if you want to set custom border color for SmartPayPaymentView while preserving all other parameters by default - you can initialize PaymentViewStyle in the following way:
let paymentViewStyle = PaymentViewStyle(paymentViewStyleBorderColor: UIColor.green) // This will create PaymentViewStyle with green border color and all other parameters with default values
You can also omit some styles in Style object initialization in the same way. Example of creating Style object which will change appearance only for navigation bar background color and for confirm button background color and corners and use it for Activity mode:
let globalStyle = GlobalStyle.init(smartPayColorNavigationBarBackground: UIColor.systemOrange)
let confirmButtonStyle = ConfirmButtonStyle.init(smartPayColorButtonConfirm: UIColor.systemOrange,
                                                 smartPayColorButtonConfirmCorners: 7)

let customUserStyle = Style(globalStyle: globalStyle, confirmButtonStyle: confirmButtonStyle)
smartPayCheckoutActivity.startActivityForResult(viewController: self, transactionId: transactionId, style: userStyle)